dbt has been around for several years now, and it has released loads of great features. We’ve seen unprecedented community adoption for dbt, and that means there’s also loads of community tools built for dbt to enrich it in many different ways.
We’ve been using dbt for years at Tasman, and we’ve worked with a variety of clients using dbt in weird and wonderful ways. A common theme we see in our dbt work, and in many other work streams, is the need for reduced development resources, both in terms of time and cost.
In this article, Andrew Findlay, Jim Lumsden, and Bill Wallis – our team of brilliant analytics engineers – will share a few dbt best practices that we’ve picked up along the way, precisely to tackle managing development cost in multiple different ways:
- Always start with
dbt debug - Use the
--emptyand--sampleflags during development - Use
--deferto reuse production models (AKA Slim CI) - Use
dbt clone, where your database/adapter supports it - Learn the node selection syntax
- Use
dbt listand YAML selectors - Indirectly select tests with
--indirect-selection - Use incremental predicates (where performance requires it!)
- Use Jinja macros appropriately
- Enrich your project with extra packages and OSS tools!
1. Always start with dbt debug
The dbt debug command prints out a bunch of useful debugging information, such as which profiles.yml file is used and important connection details like which DB dbt is connected to.
This is a quick way to confirm that dbt can connect to your data warehouse, and is particularly important for us as folks who work across many dbt projects to confirm that we’re using the right connection for the project.
Here’s a sample of what the dbt debug command returns on our internal Snowflake account:

A nice bonus: this will only generate one browser pop-up for Snowflake authentication, rather than the several you’d get if you ran dbt run first.
2. Use the –empty and –sample flags during development
The run and build dbt commands support the --empty and --sample flags:
- The
--emptyflag limits the refs and sources to zero rows (docs) - The
--sampleflag generates filtered refs and sources based on a specified time filter (docs)
Since dbt-core doesn’t validate that the compiled SQL is valid SQL, the --empty flag is super helpful for making sure that all compiled SQL has no syntax errors. It runs fast because each model runs on no rows!
While running the models with no rows has its place, it’s often better to run on a sample of rows instead: this saves time by not processing everything, while still running your transformations on some data.
The --sample flag takes a time specification and filters the source and ref models by that spec. For example, --sample "1 day" would filter the models to only keep the rows within 1 day ago. The caveat is that you need to add the config.event_time config to each of the source/ref models that you want to support sampling so that dbt knows which column to filter on.
Check the dbt docs for more details.
3. Use –defer to reuse production models (AKA Slim CI)
The --emtpy and --sample commands are good for improving performance during development. Additionally, there are times where you want to build some downstream models without having to build all of their upstream models, which can be particularly expensive.
This is where deferral comes in: you can tell dbt to use the prod version of a model during your dev run. The dbt docs have a great illustration for this:
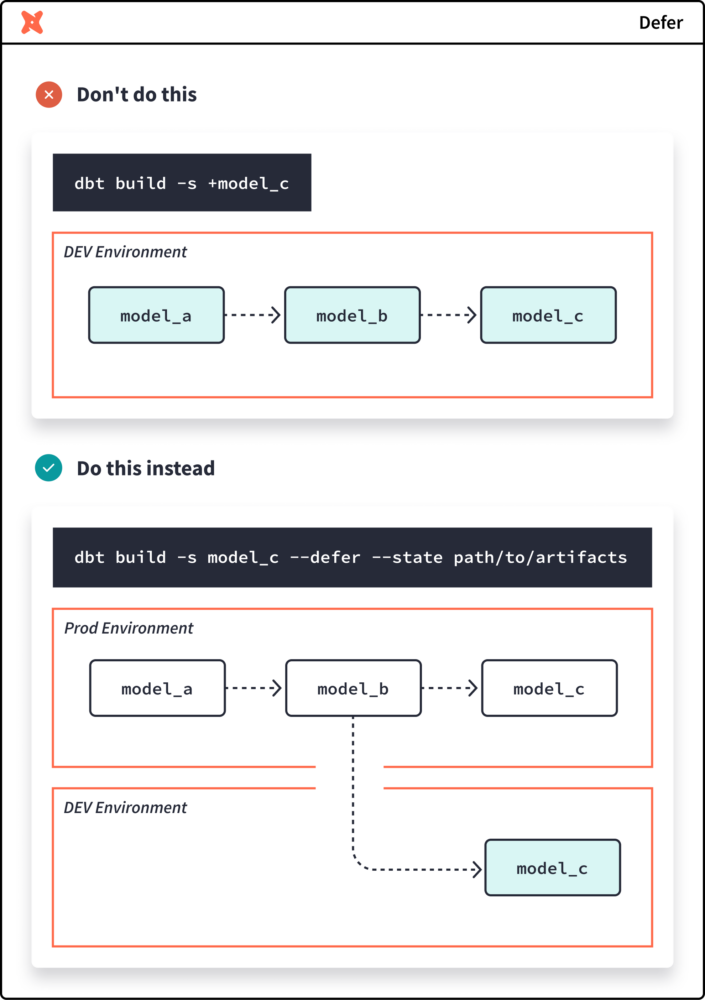
Rather than build model_a and model_b in your dev schema to then build your dev version of model_c, you can defer using the prod version of model_b for your model_c instead! From the image above, the CLI command to build model_c with state deferral is:
dbt build --select model_c --defer --state path/to/artefacts
The obscure part here is the path/to/artefacts. These are just the JSON files that end up in your target/ directory when you run some dbt commands, and getting the state for your production runs is far simpler than you might think!
Assuming your production dbt runs are using the default branch of your dbt project’s repo, you just need to:
- Generate the prod state of your dbt project by running
dbt parse --target-path prod-run-artefactson your default branch (you might also need to use your prod profile, too) - Switch to your development branch and run
dbt parseto get your dev state - Run any dbt command with
--defer --state prod-run-artefactsto defer to your prod state!
For example, we could run the following to check which models have been changed in our development branch (more on dbt list below!):
dbt list --select state:modified --defer --state prod-run-artefacts
For example, here’s a small illustration using the dbt-duckdb adapter with dev and prod profiles, which builds a new model in the dev schema whose dependencies points to their corresponding prod models:
# commit some changes to the `feature-branch` branch

git checkout main
dbt parse --target-path prod-run-artefacts --target prod

git checkout feature-branch
dbt parse

dbt build \\
  --select some_new_model \\
  --defer --state prod-run-artefacts --favor-state \\
  --indirect-selection cautious
(More on the --indirect-selection below!)
State deferral is how we can easily implement what’s known as “Slim CI” in dbt; for a full breakdown of how to implement state deferral and “Slim CI” in dbt, check out Paul Fry’s excellent article.
State deferral is easily one of the best ways to save time (and money!) during your development, and this is something that we strongly encourage you to get into the habit of using! It is easily one of the best dbt best practices that you can start implementing today.
4. Use dbt clone, where your database/adapter supports it
State deferral is great for reusing production models during development, but dbt also supports an alternative approach for reusing production models: cloning.
The underlying database will also need to support this so it’s not available to all warehouses (currently only Snowflake, Databricks, and BigQuery), but this is simply defining your development schema objects as clones (CREATE TABLE CLONE) of your production objects.
Like state deferral, dbt needs to know about the production state to be able to clone it, so you need to write the prod state artefacts to your machine before running dbt clone; an example of using the dbt clone command is:
# clone all of my models from specified state to my target schema(s)
dbt clone --state path/to/artefacts
Cloning offers similar benefits to state deferral, but the use cases are more specific — to reference the dbt docs, the clone command is useful for:
- blue/green continuous deployment
- cloning current production state into development schema(s)
- handling incremental models in dbt CI jobs
- testing code changes on downstream dependencies in your BI tool
Since cloning is a bit more advanced, we won’t go into further details here. Instead, we recommend getting up to speed with what zero-copy cloning is in your warehouse:
…and then checking out the following dbt article which describes when you would use state deferral or cloning.
5. Learn the node selection syntax
One of the first things you learn about dbt is the --select (and --exclude!) option which is supported in most of the dbt commands, for example:
dbt run --select some_specific_model
The --select option (or -s, for brevity) is way more powerful than just selecting single models! The docs go into all the details about what you can select.
Two aspects of the selection syntax that we like are the graph operators and set operators.
There are three graph operators:
- The “plus” operator,
+, which includes the resource and either its ancestors or it descendants (or both!) depending on which side of the resource it’s place - The “n-plus” operator,
n+when on the left or+nwhen on the right, which only keepsnancestors/descendants from the resource - The “at” operator,
@, which only goes on the left of the resource and will include all ancestors of all descendants of the selected model
There are also two set operators:
- Union, which is a space “
- Intersect, which is a comma
,(with no spaces!)
These are often used alongside the graph operators, for example:
# run stg_purchases and its descendants, and fct_orders and its ancestors
dbt run --select "stg_purchases+ +fct_orders"

# run common models between stg_purchases' descendants and fct_orders' ancestors
dbt run --select "stg_purchases+,+fct_orders"
The best way to get used to these is to launch the dbt docs (dbt docs generate && dbt docs serve) and see the lineage graph update in real time as you update the --select option!

Bonus tip: model names also aren’t the only thing you can reference in the --select flag. There are loads of things you can filter by (tags, model paths, config attributes, etc), all noted in the dbt docs.
6. Use dbt list and YAML selectors
If you want to see which resources are captured in some node selection without having to launch the docs, you can use the dbt list command (or dbt ls, for brevity) to list all resources that are captured by the selection. This will list everything: not just models, but also tests, metrics, exposures, and so on.
We usually use dbt list with the --resource-type option to filter for just models:
dbt list --select "some node selection" --resource-type model
If you find yourself using a node selection often, you can save it as a “selector” in a top-level selectors.yml file! Then, you can use your selectors with the --selector option (not the --select option). The dbt docs for selectors explain all the flexible ways to define these.
Not only are selectors handy for reusing node selection patterns during development, they’re also a great way to define your pipelines! Rather than defining your node selection in your orchestration layer, defining it in the selectors means that:
- It’s easy to use the same selectors in production runs as well as local developer runs
- The models included in pipelines is version-controlled alongside the models
- Updates to the pipelines’ node selection only requires changes in the dbt project
Selectors are another dbt best practice that we recommend for providing a consistent interface between your dbt model and your orchestrator (and your devs!).
7. Indirectly select tests with –indirect-selection
While we’re talking about selection (of models), we should also mention indirect selection of tests. This refers specifically to tests which depend on multiple models, so not unique or not_null, but tests like relationships or dbt_utils.relationships_where.
By default, dbt will try to run tests very eagerly when you run dbt run or dbt build: if a test depends on a selected model (even if other models it depends on aren’t selected), it will run the test. This might not always be desirable depending on your scenario.
For example, you might be doing some development on a table, say model_1, which has a relationships test that references another table, say model_2. If you’re building your dev schema from scratch and run dbt build --select model_1, then dbt will throw an error on the relationships test as model_2 does not exist in your dev schema:

Rather than build model_2 as well, we can use indirect selection to tell dbt to not run this test. The --indirect-selection flag has four options:
eager(default): run all tests which depend on any selected nodebuildable: only run tests which depend on selected nodes or their ancestorscautious: only run tests where every dependency is selectedempty: ignore all tests (this option is automatically used for interactive compilation)
In the example above, either buildable or cautious would tell dbt to ignore the relationships test (assuming that model_2 is not an ancestor of model_1) but will still run any other appropriate tests.
The dbt docs have a great set of visualisation to illustrate the impact of the different indirection selection options.
8. Use incremental predicates (where performance requires it!)
This tip is actually two depending on how new you are to dbt:
- Tip 1: use incremental models for tables that only need to process the “latest” rows
- Tip 2: use incremental predicates for slow-performing incremental models
Chances are you’re already using incremental models, so we won’t go into much detail here, but the summary is that incremental models only process unseen records since the last execution, rather than rebuild its entire table every run. This can be a considerable cost—and time!—saver where you have large tables (millions of rows) and/or complex transformations: in large-scale enterprises, it’s common for most tables to be incremental to save on computation costs and to enable high-frequency updates.
For more details on incremental models, check out the dbt docs.
Where an incremental model’s table is sufficiently large, you might find that the usual incremental approach can still have some performance struggles — typically where your unique key is different from the column the table is indexed/clustered by.
The incremental predicates are simply additional conditions to add to the various WHERE conditions that an incremental model generates, such as in the generated MERGE statement. Using the example in the dbt docs, suppose your model is part of a daily batch, has an id unique key, and is clustered by session_start, then you might want to add an incremental predicate on the session_start column so that your database can easily focus on a significant subset of the id values for comparison:
/* Config in the incremental model's SQL file */
{{
  config(
    materialized = "incremental",
    unique_key = "id",
    cluster_by = ["session_start"],
    incremental_strategy = "merge",
    incremental_predicates = [
      "DBT_INTERNAL_DEST.session_start > dateadd(day, -7, current_date)"
    ]
  )
}}

...
The example above filters the session start date for the previous week: this would only be appropriate if there would be no new id values more than a week ago, otherwise the incremental predicate would filter those out before they’re added to the incremental model’s table!
There’s also some nuance in how the incremental predicates need to be written, such as including the DBT_INTERNAL_DEST and DBT_INTERNAL_SOURCE aliases — check the dbt docs for additional details.
9. Use Jinja macros appropriately
This is a contentious tip, but… we strongly recommend creating and using Jinja macros in SQL files “appropriately”.
Jinja macros give you a great amount of flexibility to construct your SQL, so it can be tempting to modularise loads of your logic into Jinja macros. While the advantage of this is modular logic, we feel that there are three particular downsides to using Jinja macros:
- Jinja is often far less readable than pure SQL, making it harder to understand and maintain your project
- Jinja macros aren’t typed, so unless you/your team appropriately document your macros, it can be hard to know how to modify and use macros correctly
- There’s no built-in support for testing Jinja macros, although our friends at Xebia Data have released pytest-dbt-core which is a pytest plugin to address this
In particular, Jinja macros are not an escape hatch for bad data modelling.
It’s hard to define what “appropriate” usage is, and it almost always depends on the context, so here are some generic examples of where we’d lean towards updating our data model over using Jinja macros:
- Instead of using dbt_utils.date_spine for dates, add a calendar table—AKA date dimension—to your warehouse (DuckDB SQL example here, created by one of the Tasman folk)
- Instead of mapping category IDs to values/descriptions in a
CASEstatement inside a macro, create a seed file to join onto - Instead of defining CTEs inside a macro, create ephemeral models (or table/view models, depending on your needs)
However, Jinja is good for small, repeated transformations that you need to apply across several columns and/or models, such as dbt_utils.generate_surrogate_key. In particular, Jinja macros are a dbt best practice in packages that support multiple adapters: since different databases can have different functions/syntax, it’s often very convenient to abstract certain operations into Jinja macros with the warehouse-specific functions/syntax implemented behind the scenes.
In general, Jinja is best when you keep it simple: “simple is better than complex”.
Bonus: although dbt doesn’t support custom Python in Jinja (and doesn’t plan to, either), there are open source packages which give you this flexibility, such as (disclaimer: this package is owned and maintained by one of the Tasman folk):
10. Enrich your project with extra packages and OSS tools!
Since dbt is so popular, there are loads of open-source dbt packages, Python packages, and others to extend it! Here is a shout-out to some of our favourites:
- dbt-completion.bash: shell script for adding autocomplete to the dbt CLI
- Elementary: dbt package for data observability
- Power User for dbt: VS Code extension to enrich the dev experience with dbt
- dbt-colibri: Python package for extracting and visualising column-level lineage
- dbt-datadict: Python package for managing consistent column descriptions (disclaimer: owned and maintained by Tasman)
- dbt-checkpoint: pre-commit hooks for linting dbt projects
At Tasman, we also own and maintain a few open-source dbt packages which you might like:
- tasman-dbt-revenuecat: RevenueCat raw data export transformation
- tasman-dbt-mta: multi-touch attribution engine for marketing analytics
- tasman-identity-graph: resolving an identity graph with the connected component algorithm
Build better dbt projects with Tasman’s expert insights
dbt is one of the core tools that we use every day at Tasman, across several companies and industries. Following these dbt best practices makes it easier to work with dbt, regardless of whose dbt project it is, and keeps the developer costs down.
Whether you want to build a data platform from scratch, or you want to level up your existing platform, we’d be happy to share our experiences and discuss how modern tools like dbt can enhance your platform.